Monday, June 02, 2008

Make a stunning multi-layered web banner in Photoshop


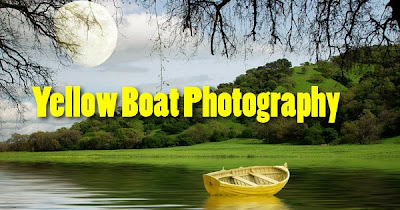
There are many ways to create effective web graphics, so I thought it would be fun to create a colorful, unique web site banner using multiple layers in Photoshop. Contrary to popular belief, manipulating layers in Photoshop is fast and easy, and can allow you to be ultra creative in the designs for web banners either for your own site or for a client project. The banner I will create step-by-step using several different photo and elements of mine will show you the basics to help you get started experimenting with the power of multiple Photoshop layers.


Procedure:

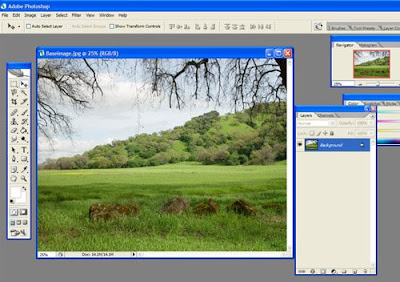
First, open your ‘base image.’ In the example, I used a scenery shot of a field with a hill and lots of green grass and trees, and also a foreground tree overhang for depth. When working with your base image, remember that you are going to be cropping the final image to fit into the constraints of a banner, which will vary depending upon the site you are designing for. In the example I will show you, the final finished banner size will be (in pixels) 600 wide, by 300 high, at 72 ppi. So, with this in mind, mentally select a focal point area in your base image, and after a few adjustments of this base image, and the addition of several graphic elements, we will crop it to the correct size. Or if you just want to make a nice picture, you won’t have to crop anything.


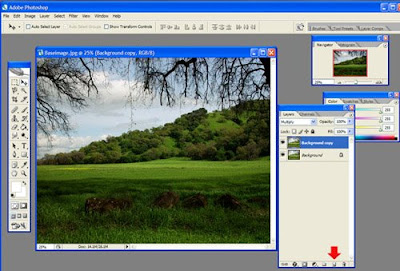
For the next step you will simply go to the Layers Palette and drag this background layer down over the New Layer icon (at the bottom of the Layers Palette next to the Trash Can icon), which will duplicate your base image. At the top of the Layers Palette choose Multiply from the little pull down menu bar. This will darken your base image markedly, so be sure you started with an image that wasn’t dark to begin with, something that is a lighter or medium range in darkness and contrast should do fine. See example:


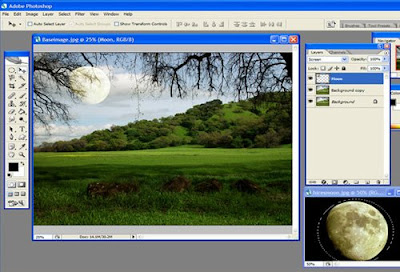
Next, we want to start adding some graphic elements, so I opened up a photo of the Moon that I captured, and selected it with the circle marquee tool up at the very top left side of the vertical toolbar, and copied and pasted it onto my background image using CTRL+C followed by CTRL+V. At the top of the layers palette you will now see the Moon layer. I also clicked the pull down menu at the top of the layers palette, and selected Screen, which eliminates any of the black background my moon was sitting upon. It also helps it blend into the cloudy background a little, and remains a bit transparent so the tree branches show through it, giving a bit of ‘false depth’ to the image. See my example of this step:


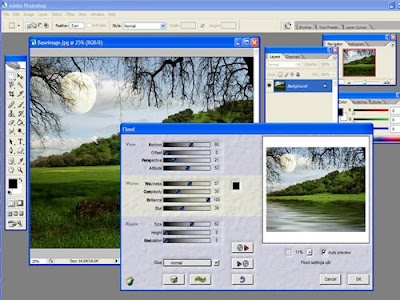
For the next step of our image creation here, we need to click on Layer, and Merge Visible (this command is close to the bottom of the Layer drop down menu) so that we basically merge all three of the layers you have so far, in order to be able to apply a special effect from our Plug-ins. Once you have performed the Merge Visible command, you will see that there is now just one layer called Background. At this point, call up your Flood plug-in (Filter>Flaming Pear>Flood), or anything else you may have available to make the effect of a glassy lake on your base image. Click OK once the settings of Flood are where you like them, and you should have an image that is like the one shown:


Okay, we are getting very close to the end of this exercise, but I felt like this picture was still a bit plain, although it is coming along. I decided that it might look nice to plonk another graphic element in the mix, so I opened up a photo of a boat that I took some time ago, and just simply dragged that onto my nice background image. I made a few minor adjustments of the boat, such as Edit>Transform>Scale, to make it smaller, and I also moved it around until it was in a place that looked good to me. See the example:
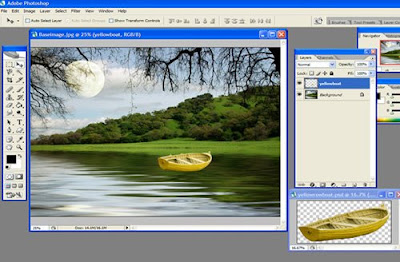


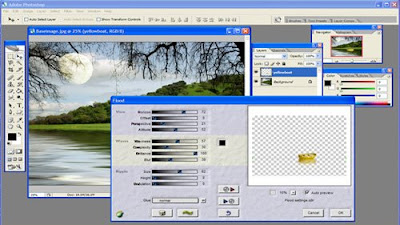
This looks all right, but the boat seems to be floating in space rather than on the lake I just created, so that must be remedied! What is nice about Photoshop, is that it lets you apply effects to each individual layer. In other words, I can add the Flood effect to the boat individually, and make it look like it ‘belongs’ on the water there, blending in. Making sure the boat layer is active or highlighted in the Layers Palette, click on Filter>Flaming Pear>Flood, and try to match up the reflection with the bottom of the boat, so that no space is between the reflection and the bottom of the boat. See the example:


Once you click OK, the effect will apply to the boat, and will make it look like it belongs in the picture as the example:
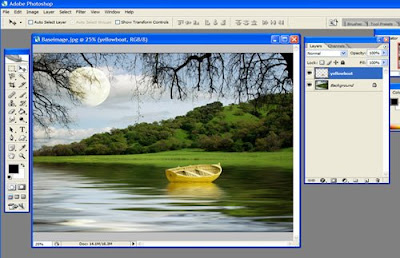


We are nearly finished, we just need to crop the image to a more ‘banner-appropriate’ size, and then add some text. So, let us begin by cropping this large image to something more manageable for our project banner. First, click Layer>Merge Visible again, so we get all the layers merged together. Now, grab the Rectangular Marquee tool, the top left tool in your vertical toolbar, and drag it inside your picture taking a chunk of your image that includes the main elements like the Moon and the rowboat, plus some of the water. You will want to then click Image>Crop, and take a look at what your markedly more banner-sized image looks like now. See the image example:
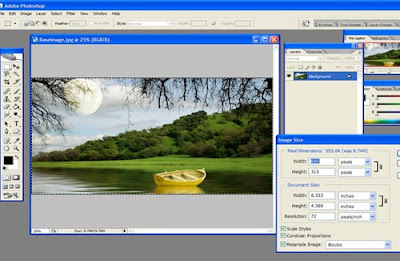


My image turned out to be about 600 pixels wide by 315 pixels high. This size is fine for my Blogger format sites. You may need to experiment with the size for your particular application. Next we will add some text, and then you will be finished with a very nice, creative, and unique banner for your blog or for a web site.

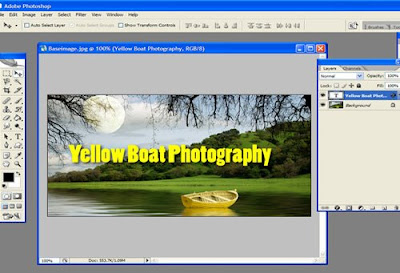
To complete this process, Click on your Text Tool in your vertical Toolbar. I chose a font called Poplar Std. which is a tall, blocky typeface. Type your title in the color you desire, and then apply a drop shadow effect to that type using the effects button located at the bottom of your Layers Palette, second from the left (looks like a black circle with a scripted “f” in it), and choose Drop Shadow. Click OK. Now it is time to click Layer>Flatten Image to merge this new type layer with the rest of your design. Once you flatten the image, be sure to save it as a .jpg, and you are ready to upload it to your site. See the example of my final flattened image: The example turned out perfectly and you can see it below and in the example at the beginning of this tutorial!

Sunday, February 24, 2008

Creative Color Gels Effect


Here's another cool thing you can do with b/w images. You can actually colorize parts of the b/w image using gel effects in Photoshop. You create these different gels quite easily, and I have a step-by-step description that I modified from an article I read in Layers Magazine from Adobe. This is a fun trick, so try it out when you get the chance or if you need a Photoshop project to study!

Open a color digital image to begin with, preferably with a person or animal in it in Photoshop. Click on the ‘create new adjustment layer’ icon at the bottom of the layers palette, and choose ‘channel mixer.’ Click the monochrome check box, and then adjust the sliders to get the b/w look you want (the three sliders add up to roughly 100% as a rule of thumb). Click OK. Using the rectangular marquee tool (M) make a selection of the first area you want to colorize by enclosing it in a ‘box.’ After making the selection, add a Hue/Saturation adjustment layer. Check the colorize box, and move the hue slider to get the color you want. You can also raise and lower the saturation by moving that slider as well. Click okay. Based on this selection, a layer mask is created that limits the area to be colored.

With the Hue/Saturation layer still active, click on the Add a Layer Style icon at the bottom of the layers palette and choose Stroke from the menu. Click on the color swatch and pick a color from the picker that’s similar or contrasting to the color tint you chose on that layer. Click OK to close the color picker. While the layer style dialog is still open, add a drop shadow and position it so that the shadow acts more like an outer glow. Click on OK to close the Layer Style dialog. Press Ctrl-J (PC) to duplicate the Hue/Saturation adjustment layer and then use the Move tool (V) to reposition the new colored box by dragging it to another area of the picture you would like to see this effect on. Open free transform or rotate tool and rotate the picture to where you would like it oriented.

Repeat the last step to create as many colorized boxes as you want. In my example above, I rotated the other copies and had each box overlap the other slightly.

Note: you can choose the stroke to be white that surrounds the boxes rather than a color that matches the hue chosen for each. It’s all up to you, the artist!

Saturday, February 09, 2008

Colorize Parts of B/W Images In Photoshop


This is a really easy and fun project to try on your black and white digital images, or in my case digital infrared black and white images. You can make all or part of your black and white image a color, and it looks really neat, like a sepia tone or blue, or anything you like. See the examples above and try your hand at this easy Photoshop trick:

Open one of your b/w images in Photoshop. Then create a Hue/Saturation adjustment layer (round button, half white, half grey, fourth from left at bottom of the layers palette) Layer>New Adjustment Layer>Hue/Saturation. In the new layer dialog, choose Color as the Mode, then in the Hue/Saturation dialog, move the Hue slider completely to the left and click OK. The image should have a nice, ethereal blue tint to it. If you used an infrared image, then the trees or anything green will still look glowing white like in the b/w version. Flatten the image (Layer>Flatten Image).

Now, create a duplicate layer (Layer>Duplicate Layer). You now should have two identical layers, one on top of the other, both with a blue tint. Click on the bottom layer (which probably will be called ‘background’) in the layers palette. Then go to Image>Adjustment>Hue/Saturation, and completely desaturate that layer by dragging the Saturation slider to -100.
Nearly finished now. Click on the top layer and select the Eraser tool from your left Toolbox and erase the area you want to remain black and white. Adjust the Levels or Curves. Flatten the image and Save As and name it what you like. Now you have a really neat b/w and color image mix. Fun!

Sunday, January 27, 2008

Working With Type - Tip 2: Photo Filled Type


This is a super fun Photoshop tip that I use over and over again. You can make a creative title or banner for your website, or make your own neat looking logo for any of your graphic designs and creations.

Open a photo in Photoshop, (for this design I used an orange wild flowers photo) and resize it to something manageable, such as 450 wide by 338 high, 72 point. This will enable you to make a graphic that is easily web site-ready.

Next, click on the Type Tool in your left tool bar, and then click on top of the photo, and type your name or any other word or words you’d like to fill with a photo. Pick a font that is fairly bold and thick, so you can best see the effect. I usually start with a thick font like Arial Black or Poplar Std. I also start with the font size being around 72 pt. You are going to resize the type, so it doesn’t matter really, other than to be able to see what you are doing well enough. Once you have typed the word or words, hit Control (CTRL) and drag the transformation anchors that appear to stretch the type to be nearly as large as the photo behind it. See the "Start" image above.

Now you need to duplicate the background or photo layer by dragging the layer in the Layers Palette over the New Layer icon at the bottom of the palette, (next to the trash bin symbol). Click and drag that new Background Copy layer above the type layer. Then, click “Layer” from the top drop down menu and choose “Create Clipping Mask.” You will notice in the layers palette now that the Background Copy layer is indented with an arrow, but the image doesn’t change yet.

Click the New Layer icon in the Layers Palette to create a new blank layer named “Layer 1.” Click and drag this new blank layer below the type layer. Press D to reset the default colors. Click CTRL+Backspace to fill the new layer with white. Now you will see the photo fill the letters on a white background. If you would prefer that your image sit on a black background, press X instead of D to change the default background to black, then click CTRL+Backspace to fill the new layer with black.

Just for fun, experiment with your text layer once you have the clipping path in place. On the white background version, click on your text layer and click the effects button at the bottom of the Layers Palette (black circle with an ‘f’ inside it), and choose “Drop Shadow.” This pulls your letters out a bit, and makes them look very ‘dimensional!’ Another fun thing to do if you decide to go with the black layer or another dark color is to click the effects button and choose “Bevel and Emboss” keeping the default of outer bevel. Click okay, and then choose the effect button again, and this time click on “Outer Glow” and see what a neat effect you can come up with. Look at my examples above, they are both done according to my tips in this paragraph.

Once you are happy with your text design, make sure you click the top drop down menu “Layer” and then “Flatten Image.” Save this as a .jpg and you have a nice web-ready title or banner, or whatever! Now wasn’t that fun and easy?

Saturday, January 19, 2008

Working With Type - Tip 1: Fire and Type


For the next few posts, I thought I would share some exciting tips about dealing with type using Photoshop (of course). Type is very important, and can make your design projects and web sites or blogs look very professional and nice. The first one I want to share here is called Fire and Type, which puts a wonderful burning flame effect around your type!

Open Photoshop and click File>New. When the size menu comes up, specify Width= 6 inches, Height= 5 inches, 72 ppi, Grayscale, and White.

Fill this square with black by pressing D on your keyboard to default the foreground color to black, and then click ALT>Delete, which will fill your square with black.

Now make your foreground color white by typing X on your keyboard. Click on your type tool and then click inside your black box. Type a word and make it 100 pt large, and make it bold if that is available in the font you chose. Click on Layer>Rasterize>Type.

Next, click on the Image menu, and choose Rotate Canvas, choose 90 CCW. Click on the Filter menu and choose Stylize>Diffuse>Normal. Click on Filter again, and this time choose Blur>Gaussian>3 pixels. Click on Filter yet again, and this time choose Distort>Ripple>100>Medium.

Now reset your default color to black again by clicking D on your keyboard. Click on the type tool again, and type that same word you typed earlier. Using your move tool pointer (V), move the type around so it sits over the odd looking old version of your word. Click on Layer>Rasterize>Type like the last time. Click on Layer>Flatten Image.

Next, go to the Image menu and click Mode>Indexed Color. Once you have performed that, go to the same menu again and click Mode>Color Table, and choose Black Body from the drop down list. Voila, here is your flaming type! Fun huh?

If you want to save this as a .jpg, I suggest resizing the image a bit, depending upon what you want to use it for, and then click on Mode from the Image menu again, and this time choose RGB. This will allow you to save the file as a .jpg. You can now use this on your web site, it will look really cool (or hot actually!)

Tuesday, January 08, 2008

Make a Frame Around Your Photo From Your Photo!


Here's a fun little tip I borrowed from a book about Adobe Photoshop CS2, "Top 100 Simplified Tips & Tricks. I have modified the steps somewhat, and I really like this. There are so many ways to make frames for your photos in Photoshop, this is just one of the many I will cover on my blog here. This one is extremely easy to learn and do, so I thought I'd post it and have you try it out. Have fun!

Open a nice photo like the one I opened on the left (it can be any subject, but I chose a flower since I have tons of flower photos!). Resize it to something 'manageable' - I like 640 x 480 for small uses, and 1024 x 768 for larger prints, etc. All of my posted photos on this blog, incidentally are 450 x 338, except for this one, which is slightly larger to accommodate two photos together.

OK, once your photo is open and is resized to what you would like, click on the Rectangular Marquee tool (the top left tool in the vertical toolbar). Click and drag inside the photo where you'd like the frame to end (make it any thickness you like). This is how you delineate the actual frame on your photo. Then click Select>Inverse. Once you do this, and you see the 'crawling ants' of the selection area, click Control (CTRL)+J to jump this selection to its own layer. While the new frame layer you've just created is still active in the layers palette, click the tiny arrow in a circle that is at the extreme top/right of the layers palette. A menu will fly out, and pick "Blending Options" and click on that. When the fly out menu pops up, click on the drop down menu in the upper center of that screen and choose the mode of "Screen." You'll see the area around your photo that you chose with the Marquee tool go lighter. This is the beginning stage of your frame, looks cool huh?

Next, from the bottom of your layers palette choose the Add Layer Style button, which is a black circle with a script "f" inside it. From this palette, click on "Stroke." You will see a border around the inside of your new frame that comes up whatever the default color is. You can click that color thumbnail and change it to white or whatever you think looks nice with your photo. You can also change the thickness of that border line around your photo using the slider. I like to keep it thin like in my example, that border is size "2." Click the "Drop Shadow" from that same menu to give the frame a bit of depth. You can change the orientation of the drop shadow using the little radius circle (just move it whichever way looks best for your photo/frame).

You are almost done, just click Layer>Flatten Image from the top menu in Photoshop, and 'voila' you are finished. (Don't forget to "Save As") Nice effect isn't it? And talk about easy...

Saturday, January 05, 2008

How to Create a Fun Kaleidoscope Effect Graphic in Photoshop!


Hi all, here's a fun, fast, and easy creative project for your weekend Photoshop adventure:

In Photoshop, open any colorful image you have in your collection (I use flower photos). Resize the image so that it is ‘manageable’ on your workspace, I use 640 wide by 480 high (pixels), 72 ppi. After you make the size adjustment, leave that image alone for a moment and open a new document – File>new. When it asks you what size to make this new file, make it 640 wide x 960 high, 72 ppi, and ‘transparent.’ Once you get the new blank file open, copy and paste the photo you resized into it, and shift that copied image up to the top of your new blank document until it fits perfectly in the space. Next, on the original image, do the following steps: Image>Rotate Canvas>Flip Vertical. When finished, copy and paste the now vertically flipped image into the space left on the new blank file. It should be opposite or 'mirror image' of what you just pasted in there. Place that new image flush with the first image, and do: Layer>Flatten Image.

Now you’ve got a long image that has an interesting look to it, but you are not done yet! Next, select Filter>Distort>Polar Coordinates. When the little fly out menu comes up, choose “Polar to Rectangular” (the bottom radio button). Immediately afterward, click Image>Rotate Canvas>180 degrees. Then, click the Filter>Distort>Polar Coordinates one more time, and this time choose “Rectangular to Polar” (the top radio button). Finally, rotate your image 90 degrees to the right or left, and ‘voila,’ you have a really neat digital design to use on your web site, or to print, etc. Wasn’t that fun? This fun effect is from an article by Rick Sammon of the wonderful Layers Magazine. Enjoy!